3.4.1 Manual Mode (Empty)
Manual Mode. In manual mode, the random line will first be displayed in the 3D scene. Nodes may be added and their position changed interactively, in a second step. This starting random line will have two nodes, one at each end of the central inline. More nodes can also be inserted in the right click menu of the random line in the tree (see figure below). Please note that the same menu is available with the right-click on the random line in the scene.
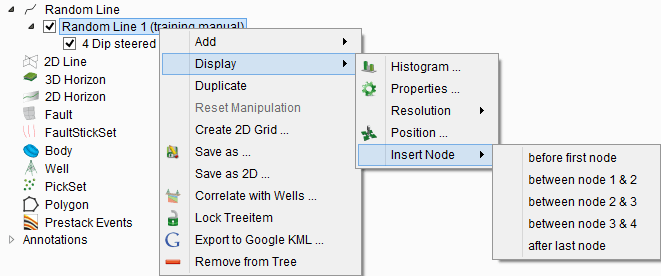
Adding/inserting new nodes between the existing nodes
The node on the left-hand side of the newly created random line is designated node 0, and the one in the right hand side node 1. It is possible to insert a node before node 0, before node 1, and after node 1. The node will be created half-way between the two surrounding nodes. In order to move a node to a desired position, click on the random line to make the nodes visible/editable. In the interact mode, click at the node plane (horizontal/vertical) to move the node location. A purple surface appears around the node and the node can be moved in any direction inside the survey area.
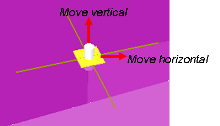
The node can be moved in two directions (horizontal and vertical). The node's orientation can be changed by placing the mouse pointer over the node and pressing the Ctrl key.
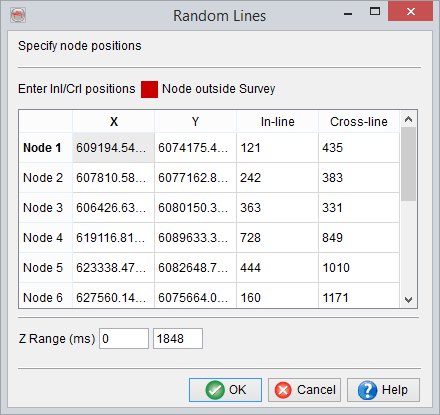
Editing or modifying the position of the nodes is also possible through clicking the option Edit nodes.... The following windows will pop-up and the nodes are editable. Modifying or inserting new nodes is also enabled. In this table, each node is defined by its inline/cross-line or X/Y position. The nodes can also be removed by right clicking over the desired cell and selecting the 'remove node' option. Similarly, for the pop-up menu, more nodes can be inserted before/after the selected cell (node).