5.1.7 Calculate Attributes
The attribute evaluation process has been considered critically and thus several key options are available for the user. For instance, Evaluate Attribute ![]() is considered as intermediate (but not necessary) step to quickly analyze the different parameters of any attribute within the working environment (View tutorial-Evaluate attributes). Similarly, the user can create a list of seismic attribute definitions as a working set that later on can be updated. The attribute set is then used to calculate the seismic attributes along lines/surfaces.
is considered as intermediate (but not necessary) step to quickly analyze the different parameters of any attribute within the working environment (View tutorial-Evaluate attributes). Similarly, the user can create a list of seismic attribute definitions as a working set that later on can be updated. The attribute set is then used to calculate the seismic attributes along lines/surfaces.
There are two possible ways of calculating seismic attributes in OpendTect: First, in order to calculate the results of any attribute in the foreground, user(s) can do it on-the-fly. Second possibility is to calculate attributes after evaluation by running a secondary process in the background. In OpendTect, seismic attributes are applied on several elements (inlines, crosslines, Z slices, random lines, 2D lines, volumes, horizons etc).
The workflow to calculate the selected attribute is quite simple:
- Define (or use existing) attribute Set and save. For details see earlier sections of this chapter.
- Calculate on-the-fly or Create Seismic Output or Create horizon attribute output.
- If attribute is not calculated on-the-fly, retrieve results by displaying attribute in tree.
The example of first step is given in following figure. It highlights the sequential process (notice green arrows form left to right) of on-the-fly attribute calculation. Firstly, several attributes are defined. Secondly, by default, when a user presses Ok button in Attribute Set window, the Save Attribute definition window will appear to save the attributes definition as an Attribute set. The attribute can then be applied on an inline (for instance) by adding a blank attribute (right-click on inline number). Right-click on the blank attribute and select the attribute (Select Attribute > Attributes > "User Attribute"). The listed attributes are those that are defined in the attributes set window. Selection of any one, would start a process of on-the-fly attribute calculation. By following same workflow (as elaborated in figure) the same attribute can be calculated along other elements (e.g. crosslines, Z-slices, volumes etc).
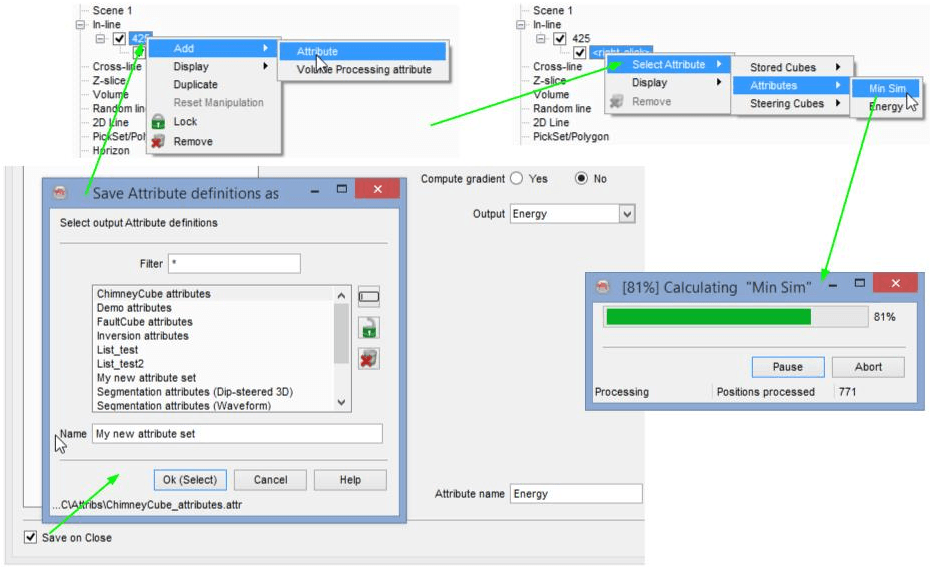
Schematic flow of on-the-fly seismic attributes evaluation on an inline.
- There are some attributes that can take too much time during the on-the-fly calculation process.
This depends upon the type of attribute that how much calculation steps it considers e.g. multi-trace (e.g. Similarity) attributes normally take more calculation time than the single trace (instantaneous) attributes. Similarly, the attributes with steering normally takes more time in calculation. So, each time the attribute is displayed in the scene (as shown above), it is calculated in the fore-ground. If the user is committed with the attributes results, this can be resolved by creating seismic outputs (See Create Seismic Output and Create Horizon Output sections) in the background. This will also help to restore the saved sessions quickly.
- Additionally, multi-component output seismics-2D/3D (like spectral decomposition) are created by using create seismic output.
Another example of second step, is shown in following figures. The attribute can be calculated along the horizon by following the same steps described above, for inserting and displaying the attribute (as shown below). In this example, Similarity is calculated on-the-fly along a horizon. This attribute normally takes time (depending upon amount of traces involved). So, user can take benefit of saving the on-the-fly results that later on can be retrieved.
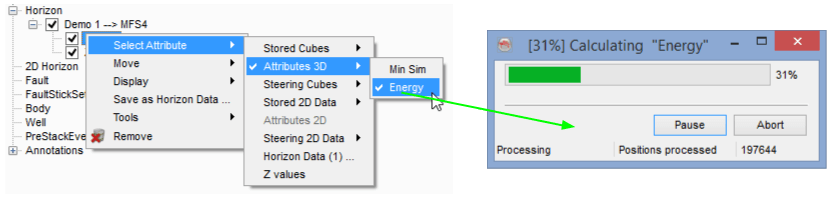
Schematic flow of on-the-fly seismic attributes evaluation at a horizon.
In order to save the calculated attribute as horizon data, right-click on the attribute and select Save as Horizon Data.... In pop-up window edit the name accordingly and press Ok. This will save the horizon attribute as its horizon data. That can be managed later on by using horizon management window. (see Management horizon)

Result of calculated similarity attribute. Saving the horizon attribute as horizon data
The stored attributes along horizon can be retrieved as horizon data. Right-click on horizon and add blank attribute. Right-click on the newly inserted blank attribute and locate Horizon data item in the sub-list of attribute (as shown below). In the horizon data selection window, select the desired attribute. This will display the selected attribute in the scene.
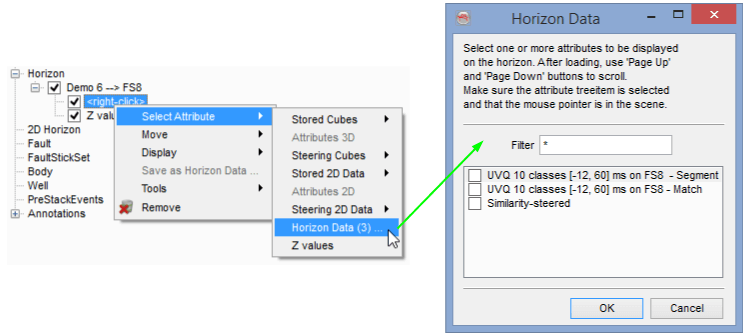
Retrieving the stored horizon data (attribute) of a horizon.